BoardMapper
🛠️ PCB placement map generator
BoardMapper is an open-source tool designed to automatically generate PCB layout. It labels component references (e.g. U1, R1, C1) directly on the circuit image, facilitating component identification for reverse engineering purposes.
🎯 Purpose
- 🤖 Automation: Eliminates the need for manual placement annotation on PCB layouts.
- ⏱️ Efficiency: Saves time for engineers and makers working on PCB assembly and debugging.
- 🔍 Clarity: Provides a clear visual reference for debugging, testing, and manufacturing.
- 💻 Cross-Platform: Works on Windows, Linux, and macOS systems.
📝 Annotation
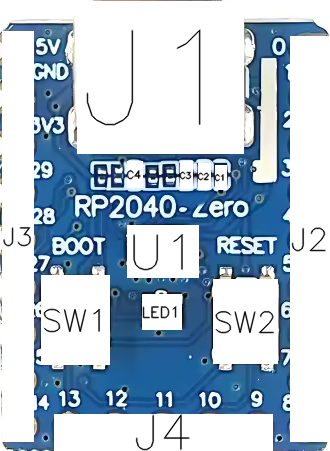
| Position | Original | Annotated |
|---|---|---|
| Top | 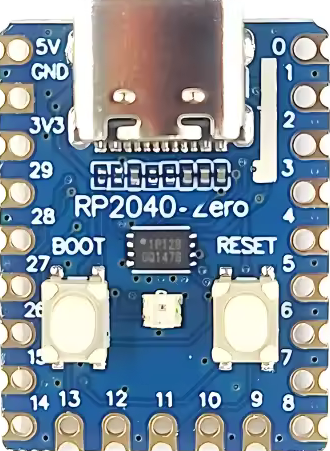 |
 |
| Bottom | 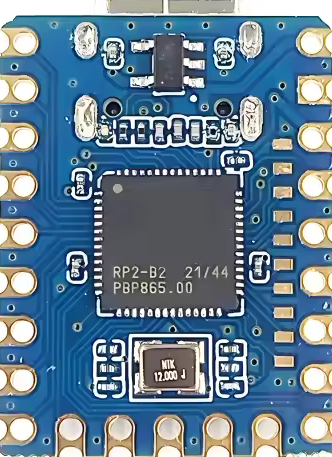 |
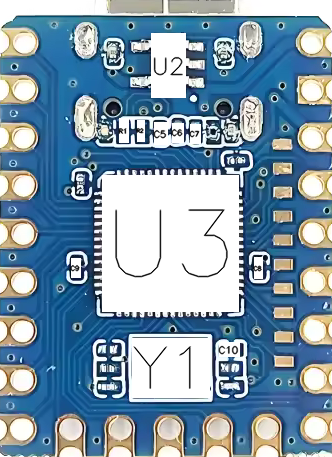 |
📋 Requirements
- Python: Version 3.6 or higher
- Required Libraries:
opencv-python(for image processing)lxml(for XML parsing)
🚀 Installation Instructions
🛠️ Setup
-
Clone the repository or Download the project to your local machine.
- Labeling the PCB:
- Step 1: Take a photo of both the top and bottom layers of the chosen PCB.
- Step 2: Place the
top.pngandbottom.pngimages into theinputfolder. - Step 3: Install the latest version of LabelImg.
- Step 4: Open
top.pngin LabelImg and draw bounding boxes around each component. Label each component according to its type:- R: Resistor
- C: Capacitor
- L: Inductor
- F: Fuse
- POT: Potentiometer
- D: Diode
- LED: LED
- Q: Transistor (BJT, MOSFET)
- U: Integrated Circuit (IC)
- J: Connector
- K: Relay
- SW: Switch
- Y: Quartz / Resonator
- SP: Speaker
- ANT: Antenna
- BUZ: Buzzer
LabelImg Shortcuts:
- ✏️ W: Draw a new rectangular bounding box (RectBox)
- ❌ D: Delete the last drawn bounding box
- 💾 Ctrl + S: Save the annotation as an XML file
- ⏪ Ctrl + Z: Undo the last action
- 📋 Ctrl + C: Copy a bounding box
- 📏 Ctrl + V: Paste a copied bounding box
- 🔍 Ctrl + A: Select all bounding boxes
- 🔄 Ctrl + R: Rotate the image (for better labeling)
- 🚫 Esc: Cancel the current operation or close a dialog box
- Step 5: After labeling the
top.png, save the annotation astop.xml. - Step 6: Repeat the labeling process for the
bottom.pngand save it asbottom.xml. - Step 7: Place both
top.xmlandbottom.xmlinto theinputfolder.
- Running the Tool:
- Windows: Double-click on
setup_and_run.batto automatically run the script. The tool will read the XML annotations, draw bounding boxes on the images, and save the annotated images. - Linux/macOS: You can run the script from the terminal:
chmod +x script.sh
./script.sh
- Windows: Double-click on
- 📂 Output:
- After the script has executed, navigate to the
outputfolder to find the resulting annotated images:top_annotated.pngbottom_annotated.png
- After the script has executed, navigate to the
🤝 Contributions
If you’d like to contribute to the project, please follow these steps:
- Fork the repository
- Create a feature branch
- Commit your changes
- Push to the branch
- Open a pull request
We welcome any contributions to improve BoardMapper! 🎉